Deploy your NFTs on the blockchain with Starton
In this tutorial, we will see how we can deploy a smart contract and interact with it in order to mint NFTs dynamically from code.
In this tutorial, we will see how we can deploy a smart contract and interact with it in order to mint NFTs dynamically from code.
The NFTs will be random images that will be dynamically uploaded on IPFS (a decentralized file storage system) and assigned to an Ethereum address.
To do this we will :
- Use a template from Starton for our smart contract (ERC721).
- Deploy it with Starton from the dashboard. You can also do it from code: Deploy a template contract from code.
- Upload the content of our NFTs and their metadata on IPFS.
- Interact with our smart contract using Starton’s API in order to mint the NFTs and give them to a specific address.
If you feel stuck or have questions, feel free to get in touch in our Discord. We’ll be glad to help you!
I) Choose a smart contract template
Several standards of smart contracts have been developed for NFTs.
The most famous ones are the ERC721 and the ERC1155.
The main big difference between the two is that in an ERC721, every NFT is unique which means you will have to reference the content for each of them. Meanwhile the ERC1155 enables you to create “collections” where there are several copies of the same NFT.
The ERC721, which is easier to use, still can be used to upload several copies of the same content but is less optimized for this use case than the ERC1155. If you want to see in more detail the differences between the two standards you can follow this guide.
For our use case, we will choose to use the ERC721 smart contract template. We’ll also use IPFS to store the content that will be referenced in our deployed contract.
Note: We do not store the content directly on blockchain as it is too heavy and would induce a very high cost.
The best solution is to store it somewhere else and only store a reference on-chain.
II) Deploy the contract with Starton
We will deploy the contract only once, so we will do it directly from Starton’s dashboard. You can still deploy contracts dynamically following our tutorial Deploy a template contract from code.
We can access the list of templates here.
- From Dashboard, go to Smart Contract.
- Click Deploy with Template.
- Select the ERC721 template.
- Enter:
- a name for your contract,
- a wallet to sign the transaction,
- a blockchain/network on which to deploy,
- the parameters of our contract. For more information on parameters, check out Deploying a Smart Contract.
For example, we can call our contract “My Super NFTs” and deploy it on the Polygon Mumbai network.
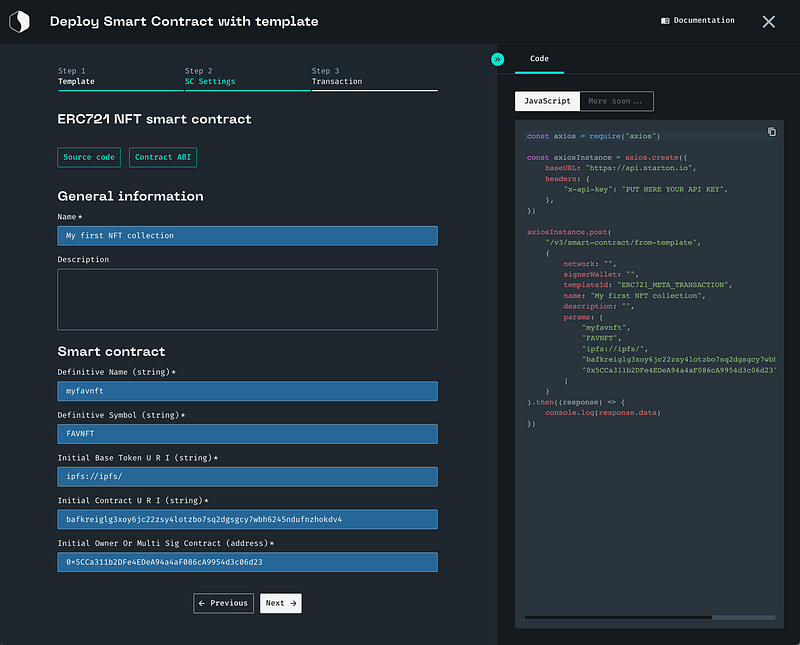
The following constructor parameters are :
- Definitive Name: The name of your smart contract which will be reflected on-chain.
- Definitive Symbol: The symbol of your token.
- Initial Base Token URI: Will be used to get the token URI.
- Using IPFS:
ipfs://ipfs/ - Using a centralized server:
https://yourapi.com/endpoint/ - Initial Contract U R I: The URI of the metadata that will be used to give more details about the description.
- Initial Owner Or Multi Sig Contract: The address that will own the NFT Collection.
- Name: Name of the Smart contract on the blockchain.
- Symbol: The symbol of your token.
- Base URI: Will be used to concatenate NFT URIs and the ContractUriSuffix
- Using IPFS: `ipfs://ipfs/`
- Using a centralised server: `https://yourapi.com/endpoint/` - Contract URI Suffix: Will be concatenated with baseUri:
- Using IPFS: it is the CID of the contract metadata
- Using a centralised server: the path of the contract metadata json
Lost on the URI part? Let’s see this in more detail so we can finish the deployment of our contract.
To be able to fill this field we need to upload a JSON file that respects OpenSea’s specification for the contract-level metadata on IPFS.
III) Upload the contract-level metadata on IPFS
We need to implement OpenSea’s specification for the contract-level metadata that is described.
This will enable us to add a name on OpenSea’s dashboard and perceive fees when someone sells one of our NFTs.
Here are the values we will use :
{
	"name": “My Super NFTs“,
    "description": “You’ve never seen NFTs this beautiful.”,  			"image": "",
    "external_link": "",
    "seller_fee_basis_points": 100,
    "fee_recipient": “PUT YOUR ADDRESS HERE”
}
We now have the content of our metadata, we need to upload it on IPFS.
On IPFS, the content is not referred to using an address like we are used to with URLs, but by the content’s value.
Let’s see the difference :
When we query some content based on location we implicitly ask :
“Give me the content that is located at https://… no matter what it is that you find”.
Whereas when we query some content based on its value on IPFS we implicitly ask :
“Find on the network the content with the hash XXXXXXX and retrieve it, no matter who gives it to me”.
With the location-based approach, we are specific on the “How” and not on the “What” while with the content-based approach, it is the opposite.
Using the content-based approach, we are sure we get the content we want, without it being altered, replaced, or infected as otherwise, the hash would have changed as well.
And it is a game changer as we do not need to rely on trust anymore!
The hash of the content is called a CID on IPFS.
And when we will upload our contract-level metadata on IPFS we will get a CID back, which is the value we need to put as the Contract Suffix Uri in our smart contract.
To upload our files on IPFS we will now use the Starton IPFS pinning service.
As the contract level metadata only needs to be uploaded once, we can directly do it from our dashboard here.
Once done, you should see a column “CID” with a value for our file. This is the value we need for the Contract Uri Suffix of our smart contract!

We can finally deploy our contract!
Once our smart contract is deployed, we land on the interact page. We won’t interact with it from the dashboard but we can click on the smart contract address at the top to see our contract in the blockchain explorer.
We will see next how to upload our images on IPFS dynamically from code with the API.
IV) Minting an NFT
The process of minting a new NFT and sending it to an address goes in three steps :
- We upload the content on IPFS (as it is too heavy to be stored on-chain) and get the CID of the content.
- We upload a metadata object as a JSON file on IPFS as we do not reference the content directly in the contract. Instead, we put the CID of the content in a metadata object that we upload on IPFS.
- We call the function “mint” of our smart contract, giving the CID of our metadata object and the address that will receive the NFT.
a) Prepare our connection to the Starton API :
const axios = require("axios");
const FormData = require("form-data");
const starton = axios.create({
	baseURL: "https://api.starton.io/v2",
	headers: {
		"x-api-key": "YOUR_STARTON_API_KEY",
 	},
 });
Do not forget the replace the x-api-key value by your own ! It is needed to authenticate yourself with our API.
You can find your API keys and generate new ones here.
b) Upload an image on IPFS with the Starton API
We can create a simple function like this one :// The image variable should be a buffer
async function uploadImageOnIpfs(image, name) {
	let data = new FormData();
    data.append("file", image, name);
    data.append("isSync", "true");

const ipfsImg = await starton.post("/pinning/content/file", data, {        maxBodyLength: "Infinity",
   headers: { "Content-Type": `multipart/form-data; boundary=${data._boundary}` },
   });    return ipfsImg.data;
   }
By calling this function, providing our image as a buffer as a parameter, we should get back an object containing our image’s CID which we will use next in the metadata object.
c) Upload the metadata .json of our NFT
The format is described here.
We can define a new function using our image’s CID to upload the metadata on IPFS :
async function uploadMetadataOnIpfs(imgCid) {
	const metadataJson = {
    	name: `A Wonderful NFT`,
        description: `Probably the most awesome NFT ever created !`,           image: `ipfs://ipfs/${imgCid}`,
        };    const ipfsMetadata = await starton.post("/pinning/content/json",
        {
        name: "My NFT metadata Json",
        content: metadataJson,
        isSync: true,
        });    return ipfsMetadata.data;
       }
Feel free to change the name and description that suit your needs.
d) Mint the NFT on the smart contract using the metadata’s CID
Finally, we can call our smart contract “mint” function with the receiver’s address and the CID of the metadata we just uploaded:
const SMART_CONTRACT_NETWORK = "polygon-mumbai";
const SMART_CONTRACT_ADDRESS = "";
const WALLET_IMPORTED_ON_STARTON = "";
async function mintNft(receiverAddress, metadataCid) {
	const nft = await starton.post(`/smart-contract/${SMART_CONTRACT_NETWORK}/${SMART_CONTRACT_ADDRESS}/call`,{
    functionName: "mint",
    signerWallet: WALLET_IMPORTED_ON_STARTON,
    speed: "low",
    params: [receiverAddress, metadataCid],});
    return nft.data;
    }
You will need to modify the SMART_CONTRACT_ADDRESS and WALLET_IMPORTED_ON_STARTON variables so they match your contract and your wallet.
e) Assemble everything together
We can now make the complete flow in only a few lines of code.
Notice that you need to define the receiver of the NFT and set the imgBuffer variable:
const RECEIVER_ADDRESS = ""
const imgBuffer = ""
const ipfsImg = await uploadImageOnIpfs(imgBuffer, "filename.png")
const ipfsMetadata = await uploadMetadataOnIpfs(ipfsImg.pinStatus.pin.cid)
const nft = await mintNft(RECEIVER_ADDRESS,ipfsMetadata.pinStatus.pin.cid)
Annnnnd it’s done!
Once all of this is executed, the content should be on IPFS and associated with the given address in our ERC721 contract.
You should be able to see the NFTs on OpenSea with this link :
“https://testnets.opensea.io/assets/mumbai/YOUR_CONTRACT_ADDRESS/0” or by name: “https://testnets.opensea.io/collection/my-super-nfts”.
V) Conclusion
We have seen in this tutorial how to upload NFTs on a decentralized file system, how to deploy an ERC721 smart contract using Starton, how to make it compatible with OpenSea’s standards, and how we can dynamically mint the NFTs from code to send them to people!
We hope you liked this tutorial and that you will follow along in this epic journey of making Web3 the new standard for the Internet!
We are very eager to see what you can build with NFTs.
Do not hesitate to share what you’ve done!